龚哥哥 - 山里男儿 爱生活、做自己!
魔鬼部署系统搭建 Nginx+Uwsgi+Django
发表于 2017-8-23 | 浏览(44395) | 开源项目

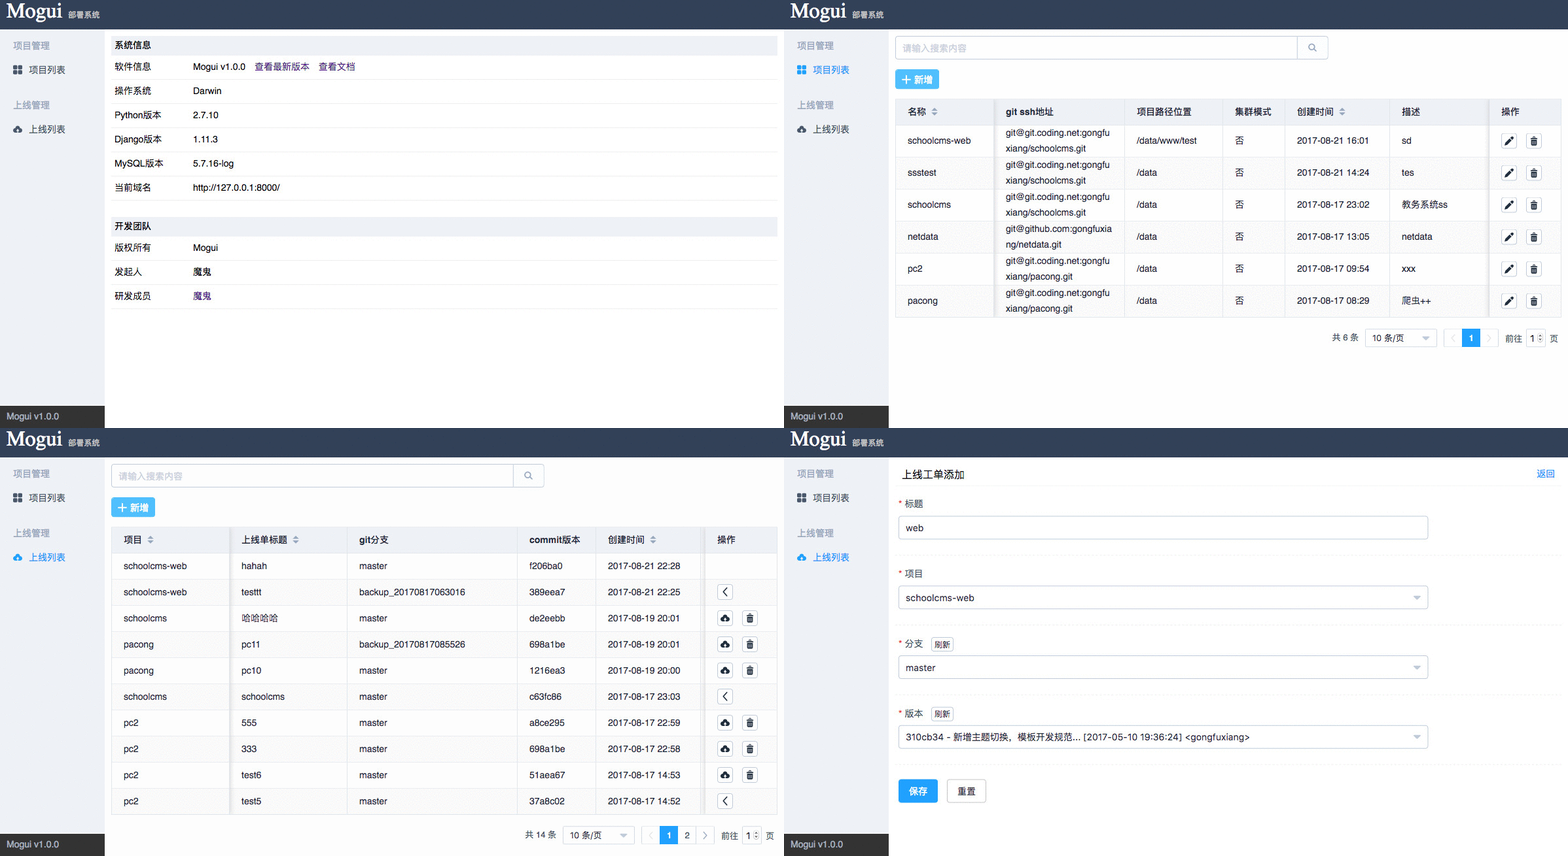
效果图

Image

流程图

Image

项目地址

https://github.com/gongfuxiang/mogui

https://coding.net/u/gongfuxiang/p/mogui/git


其它相关可参考本博客中的其它文章

1、nginx
2、git ssh部署
3、mysql

基础信息

系统         CentOS7(7.3.1611)
Python      2.7.5
Django      1.11.3
Vue         2.4.0
Element     1.4.2

centos6自带python 2.4.3, 我们也可以升级到python2.7.13(这一步可跳过)

https://www.python.org/ftp/python/2.7.13/Python-2.7.13.tgz
tar -zxvf Python-2.7.13.tgz
cd Python-2.7.13
./configure --prefix=/usr/local
make && make altinstall

安装setuptools

wget http://pypi.python.org/packages/source/s/setuptools/setuptools-0.6c11.tar.gz
tar -zxvf setuptools-0.6c11.tar.gz
cd setuptools-0.6c11
python setup.py build
python setup.py install

安装pip

wget https://pypi.python.org/packages/11/b6/abcb525026a4be042b486df43905d6893fb04f05aac21c32c638e939e447/pip-9.0.1.tar.gz
tar -zxvf pip-9.0.1.tar.gz
cd pip-9.0.1
python setup.py install

安装python-devel

yum -y install python-devel
yum -y install sqlite-devel

pip安装uwsgi

pip install uwsgi

测试uwsgi是否正常运行 创建 test.py 文件

def application(env, start_response):
    start_response('200 OK', [('Content-Type','text/html')])
    return "Hello World"

uwsgi --http :8008 --wsgi-file test.py
在浏览器内输入:http://127.0.0.1:8008,查看是否有"Hello World"输出,若没有输出,请检查你的安装过程。

pip安装django

pip install django==1.11.3

测试 django 是否正常,运行

django-admin.py startproject hello
cd hello
python manage.py runserver 0.0.0.0:8008
在浏览器内输入:http://127.0.0.1:8008,检查django是否运行正常。

安装项目需要用到的python模块

yum -y install mysql-devel
pip install mysql-python 或 pip install mysqlclient

开始部署魔鬼部署系统(github已部署好ssh)

mkdir -p /data/www
cd /data/www
git clone https://github.com/gongfuxiang/mogui.git

修改数据库配置文件

/data/www/mogui/mogui/common/config.py
修改以下配置信息保存即可
# 数据库
db = {
    'name' : 'mogui',       # 数据库名称
    'user' : 'root',        # 用户名
    'pwd'  : 'root',        # 密码
    'host' : 'localhost',   # 连接地址
    'port' : 3306           # 端口号
}

还记得新增实际部署的域名或ip

/data/www/mogui/mogui/settings.py

修改 ALLOWED_HOSTS = ['127.0.0.1', 'localhost']

创建数据表

cd /data/www/mogui
python manage.py migrate

创建uwsgi配置文件 创建 /etc/uwsgi.ini

详细可参考官网文档 https://uwsgi-docs.readthedocs.io/en/latest/

[uwsgi]
chdir           = /data/www/mogui
module          = mogui.wsgi
master          = true
processes       = 10
socket          = 127.0.0.1:9090
vacuum          = true
pidfile         = /var/run/uwsgi.pid    
daemonize       = /var/log/uwsgi.log
uid             = 0

uwsgi常用操作

启动uwsgi
    uwsgi --ini /etc/uwsgi.ini

uwsgi重启
    kill -HUP `cat /var/run/uwsgi.pid`

uwsgi停止
    killall -9 uwsgi

nginx配置(记得重启)

upstream django {
    server 127.0.0.1:9090;
}

server {
    listen      80 default;
    server_name _;
    charset     utf-8;
    client_max_body_size 75M;
    uwsgi_read_timeout 1800;
    uwsgi_send_timeout 300;
    proxy_read_timeout 300;

    location /public {
        alias /data/www/mogui/public;
    }

    location / {
        uwsgi_pass  django;
        include     uwsgi_params;
    }
}

访问 http://127.0.0.7

阅读全文

Centos7下配置nginx启动服务脚本
发表于 2017-5-29 | 浏览(12643) | 服务器

1:nginx配置文件,nginx路径根据自己安装的位置而修改  vim /etc/init.d/nginx

#! /bin/bash
#chkconfig: 2345 80 90
#description:nginx run

# nginx启动脚本
# @author   Devil
# @version  0.0.1
# @date     2017-05-29

PATH=/data/soft/nginx
DESC="nginx daemon"
NAME=nginx
DAEMON=$PATH/$NAME
CONFIGFILE=$PATH/$NAME.conf
PIDFILE=$PATH/$NAME.pid
SCRIPTNAME=/etc/init.d/$NAME
set -e
[ -x "$DAEMON" ] || exit 0
do_start()
{
    $DAEMON -c $CONFIGFILE || echo -n "nginx already running"
}
do_stop()
{
    $DAEMON -s stop || echo -n "nginx not running"
}
do_reload()
{
    $DAEMON -s reload || echo -n "nginx can't reload"
}
case "$1" in
    start)
        echo -n "Starting $DESC: $NAME"
        do_start
        echo "."
    ;;
    stop)
        echo -n "Stopping $DESC: $NAME"
        do_stop
        echo "."
    ;;
    reload|graceful)
        echo -n "Reloading $DESC configuration..."
        do_reload
        echo "."
    ;;
    restart)
        echo -n "Restarting $DESC: $NAME"
        do_stop
        do_start
        echo "."
    ;;
    *)
        echo "Usage: $SCRIPTNAME {start|stop|reload|restart}" >&2
        exit 3
    ;;
esac
exit 0

2:设置执行权限

chmod a+x /etc/init.d/nginx

3:注册成服务

chkconfig --add nginx

4:设置开机启动

chkconfig nginx on

5:重启, 查看nginx服务是否自动启动

shutdown -h 0 -r

ps -ef | grep nginx

6:对nginx服务执行停止/启动/重新读取配置文件操作

启动
systemctl start nginx.service

重载
systemctl reload nginx.service

停止
systemctl top nginx.service

重启
systemctl restart nginx.service

阅读全文

Nginx中判断是否手机访问
发表于 2016-11-23 | 浏览(6852) | 服务器

1、开源库

无论是PC还是手机,由于操作系统、浏览器的多样性,自己来实现这个判断并不容易不够准确。国外有一套开源的通过User-Agent区分PC和手机的解决方案,支持的语言较多(Apache ASP ASP.NET ColdFusion C# IIS JSP JavaScript jQuery Lasso nginx node.js PHP Perl Python Rails)

传送门:http://detectmobilebrowsers.com/

2、Nginx实例,在server中加入

set $mobile_rewrite do_not_perform;

if ($http_user_agent ~* "(android|bb\d+|meego).+mobile|avantgo|bada\/|blackberry|blazer|compal|elaine|fennec|hiptop|iemobile|ip(hone|od)|iris|kindle|lge |maemo|midp|mmp|mobile.+firefox|netfront|opera m(ob|in)i|palm( os)?|phone|p(ixi|re)\/|plucker|pocket|psp|series(4|6)0|symbian|treo|up\.(browser|link)|vodafone|wap|windows ce|xda|xiino") {
    set $mobile_rewrite perform;
}

if ($http_user_agent ~* "^(1207|6310|6590|3gso|4thp|50[1-6]i|770s|802s|a wa|abac|ac(er|oo|s\-)|ai(ko|rn)|al(av|ca|co)|amoi|an(ex|ny|yw)|aptu|ar(ch|go)|as(te|us)|attw|au(di|\-m|r |s )|avan|be(ck|ll|nq)|bi(lb|rd)|bl(ac|az)|br(e|v)w|bumb|bw\-(n|u)|c55\/|capi|ccwa|cdm\-|cell|chtm|cldc|cmd\-|co(mp|nd)|craw|da(it|ll|ng)|dbte|dc\-s|devi|dica|dmob|do(c|p)o|ds(12|\-d)|el(49|ai)|em(l2|ul)|er(ic|k0)|esl8|ez([4-7]0|os|wa|ze)|fetc|fly(\-|_)|g1 u|g560|gene|gf\-5|g\-mo|go(\.w|od)|gr(ad|un)|haie|hcit|hd\-(m|p|t)|hei\-|hi(pt|ta)|hp( i|ip)|hs\-c|ht(c(\-| |_|a|g|p|s|t)|tp)|hu(aw|tc)|i\-(20|go|ma)|i230|iac( |\-|\/)|ibro|idea|ig01|ikom|im1k|inno|ipaq|iris|ja(t|v)a|jbro|jemu|jigs|kddi|keji|kgt( |\/)|klon|kpt |kwc\-|kyo(c|k)|le(no|xi)|lg( g|\/(k|l|u)|50|54|\-[a-w])|libw|lynx|m1\-w|m3ga|m50\/|ma(te|ui|xo)|mc(01|21|ca)|m\-cr|me(rc|ri)|mi(o8|oa|ts)|mmef|mo(01|02|bi|de|do|t(\-| |o|v)|zz)|mt(50|p1|v )|mwbp|mywa|n10[0-2]|n20[2-3]|n30(0|2)|n50(0|2|5)|n7(0(0|1)|10)|ne((c|m)\-|on|tf|wf|wg|wt)|nok(6|i)|nzph|o2im|op(ti|wv)|oran|owg1|p800|pan(a|d|t)|pdxg|pg(13|\-([1-8]|c))|phil|pire|pl(ay|uc)|pn\-2|po(ck|rt|se)|prox|psio|pt\-g|qa\-a|qc(07|12|21|32|60|\-[2-7]|i\-)|qtek|r380|r600|raks|rim9|ro(ve|zo)|s55\/|sa(ge|ma|mm|ms|ny|va)|sc(01|h\-|oo|p\-)|sdk\/|se(c(\-|0|1)|47|mc|nd|ri)|sgh\-|shar|sie(\-|m)|sk\-0|sl(45|id)|sm(al|ar|b3|it|t5)|so(ft|ny)|sp(01|h\-|v\-|v )|sy(01|mb)|t2(18|50)|t6(00|10|18)|ta(gt|lk)|tcl\-|tdg\-|tel(i|m)|tim\-|t\-mo|to(pl|sh)|ts(70|m\-|m3|m5)|tx\-9|up(\.b|g1|si)|utst|v400|v750|veri|vi(rg|te)|vk(40|5[0-3]|\-v)|vm40|voda|vulc|vx(52|53|60|61|70|80|81|83|85|98)|w3c(\-| )|webc|whit|wi(g |nc|nw)|wmlb|wonu|x700|yas\-|your|zeto|zte\-)") {
    set $mobile_rewrite perform;
}

if ($mobile_rewrite = perform) {
    rewrite ^(.*) http://h5.gong.gg$1 redirect;
    break;
}

阅读全文

Nginx+Lua+Redis搭建高并发服务
发表于 2016-10-2 | 浏览(11778) | 服务器

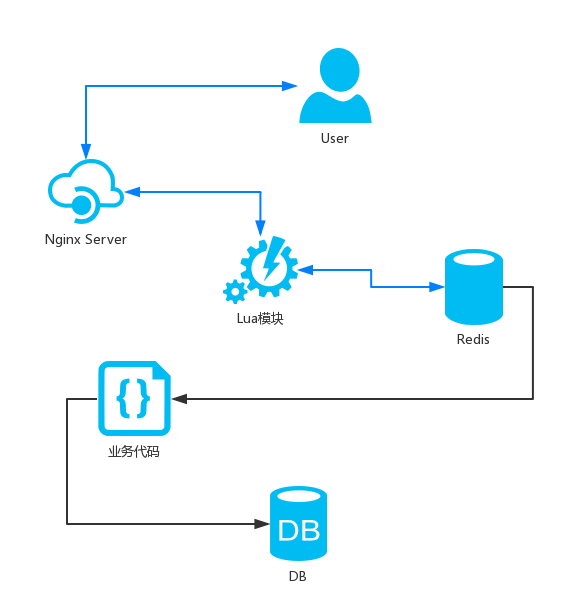
架构图


一、准备

1、服务器首先是需要安装redis服务,查看本博客中的另一篇文章
2、安装nginx+luq服务,查看本博客中的另一篇文章

二、下载lua redis库

lua-redis库地址 https://github.com/openresty/lua-resty-redis
cd /data/www/lua/vendor
git clone https://github.com/openresty/lua-resty-redis.git

三、vim nginx.conf,http中添加

lua_package_path "/data/www/lua/vendor/lua-resty-redis/lib/?.lua;;";

四、nginx server中操作redis

1、在nginx.conf中嵌入lua代码

location /hello {
    default_type 'text/json';
    local redis = require "resty.redis";
    local instance = redis:new();
    local host = "127.0.0.1";
    local port = 6379;
    local ok,err = instance:connect(host,port);
    if not ok then
       ngx.log(ngx.ERR,err);
       ngx.exit(ngx.HTTP_SERVICE_UNAVAILABLE);
    end
    local suc, err instance:set('devil', 'hello world')
    f not suc then
        ngx.say("error")
    else
        ngx.say(instance:get('instance'))
    end
}

2、在实际业务中,独立lua代码(下面是一个redis简单的demo)

location /hello {
    default_type 'text/json';
    lua_need_request_body on;
    content_by_lua_file /data/www/lua/www/redis.lua;
}

2.1、lua文件的代码   vim /data/www/lua/www/redis.lua

#!/usr/local/bin/lua

--[[
    redis操作demo
    Devil
    http://gongfuxiang.com
--]]

-- 引入redis库
local redis = require "resty.redis";

-- 实例化redis
local instance = redis:new();

-- redis配置参数
local host = "127.0.0.1";
local port = 6379;

-- 创建redis连接
local ok,err = instance:connect(host,port);
if not ok then
   ngx.log(ngx.ERR,err);
   ngx.exit(ngx.HTTP_SERVICE_UNAVAILABLE);
end

-- 获取客户端post过来的body数据
local request_body = ngx.req.get_body_data() or nil
if( request_body ~= nil )
then
    -- 客户端ip
    local client_ip =ngx.req.get_headers()["X-Real-IP"]
    if client_ip == nil then
            client_ip = ngx.req.get_headers()["x_forworded_for"]
    end
    if client_ip == nil then
            client_ip = ngx.var.remote_addr
    end

    -- 当前时间戳
    local time = os.time()

    -- 拼接redis数据
    local data = client_ip.."{-}"..time.."{-}"..request_body

    -- 队列方式存储redis数据
    local suc, err = instance:lpush('key_list', data)
    if not suc then
        ngx.say('{"code":-2, "msg":"操作失败"}')
    end
    ngx.say('{"code":0, "msg":"操作成功"}')
else
    ngx.say('{"code":-1, "msg":"数据有误"}')
end

五、测试,访问 http://localhost/hello

hello world

阅读全文

Nginx结合Lua模块
发表于 2016-10-2 | 浏览(6613) | 服务器

一、准备(软件存放目录创建)

mkdir /data
cd /data
mkdir src soft www
cd www
mkdir lua vendor
cd lua www 

二、常用库安装

yum -y install automake autoconf libtool make gcc gcc-c++ libmcrypt-devel mhash-devel libxslt-devel libjpeg libjpeg-devel libpng libpng-devel freetype freetype-devel libxml2 libxml2-devel zlib zlib-devel glibc glibc-devel glib2 glib2-devel bzip2 bzip2-devel ncurses ncurses-devel curl curl-devel e2fsprogs e2fsprogs-devel krb5 krb5-devel libidn libidn-devel openssl openssl-devel

三、nginx依赖库安装

1、安装PCRE库

ftp://ftp.csx.cam.ac.uk/pub/software/programming/pcre/ 下载最新的 PCRE 源码包,使用下面命令下载编译和安装 PCRE 包:
cd /data/src
wget ftp://ftp.csx.cam.ac.uk/pub/software/programming/pcre/pcre-8.38.tar.gz
tar -zxvf pcre-8.38.tar.gz
./configure
make && make install

2、安装zlib库

http://zlib.net/zlib-1.2.8.tar.gz 下载最新的 zlib 源码包,使用下面命令下载编译和安装 zlib包:
cd /data/src
wget http://zlib.net/zlib-1.2.8.tar.gz
tar -zxvf zlib-1.2.8.tar.gz
cd zlib-1.2.8
./configure
make && make install

3、安装ssl(某些vps默认没装ssl)

cd /data/src
wget http://www.openssl.org/source/openssl-1.0.2.tar.gz
tar -zxvf openssl-1.0.2.tar.gz
./config
make && make install
cp apps/openssl /usr/bin/
如果提示覆盖,确认就OK了,再查看openssl version版本就是最新版了

4、nginx lua扩展库

cd /data/src
wget https://github.com/openresty/lua-nginx-module/archive/v0.10.6.tar.gz
wget https://github.com/simpl/ngx_devel_kit/archive/v0.3.0.tar.gz
mv v0.3.0.tar.gz ngx_devel_kit-0.3.0.tar.gz
mv v0.10.6.tar.gz lua-nginx-module-0.10.6.tar.gz
tar -zxvf ngx_devel_kit-0.3.0.tar.gz
tar -zxvf lua-nginx-module-0.10.6.tar.gz

5、LuaJIT安装

cd /data/src
wget http://luajit.org/download/LuaJIT-2.0.4.tar.gz
tar -zxvf LuaJIT-2.0.4.tar.gz 
cd LuaJIT-2.0.4
make && make install

四、安装nginx

1、安装nginx

Nginx 一般有两个版本,分别是稳定版和开发版,您可以根据您的目的来选择这两个版本的其中一个,下面是把 Nginx 安装到 /data/soft/nginx 目录下的详细步骤:
cd /data/src
wget http://nginx.org/download/nginx-1.9.9.tar.gz
tar -zxvf nginx-1.9.9.tar.gz
cd nginx-1.9.9
./configure --sbin-path=/data/soft/nginx/nginx \--conf-path=/data/soft/nginx/nginx.conf \--pid-path=/data/soft/nginx/nginx.pid \--with-http_realip_module \--with-http_ssl_module \--with-pcre=/data/src/pcre-8.38 \--with-zlib=/data/src/zlib-1.2.8 \--with-http_stub_status_module \--add-module=/data/src/ngx_cache_purge-2.3 \--add-module=/data/src/ngx_devel_kit-0.3.0 \--add-module=/data/src/lua-nginx-module-0.10.6
make && make install

2、告诉nginxlua库路径

export LUAJIT_LIB=/usr/local/lib
export LUAJIT_INC=/usr/local/include/luajit-2.0

3、查看nginx是否正常

nginx -v
可能会出现下面的错误
./objs/nginx: error while loading shared libraries: libluajit-5.1.so.2: cannot open shared object file: No such file or directory
解决方法:
ln -s /usr/local/lib/libluajit-5.1.so.2 /lib64/libluajit-5.1.so.2

8、nginx常用操作

cp /data/soft/nginx/nginx /etc/init.d/
/etc/init.d/nginx               启动nginx
/etc/init.d/nginx -s reload     重启nginx
/etc/init.d/nginx -s stop       关闭nginx

9、进入nginx目录校验lua是否能够正常运行

cd /data/soft/nginx
vim nginx.conf(server中添加以下代码)
location /hello { 
    default_type 'text/plain'; 
    content_by_lua 'ngx.say("hello, lua")'; 
}
重启nginx即可,访问 http://localhost/hello 会出现 hello,lua

阅读全文

CentOS_6.5安装Nginx+PHP+MySQL
发表于 2015-8-31 | 浏览(6696) | 服务器

准备工作

yum -y install automake autoconf libtool make gcc gcc-c++ libmcrypt-devel mhash-devel libxslt-devel libjpeg libjpeg-devel libpng libpng-devel freetype freetype-devel libxml2 libxml2-devel zlib zlib-devel glibc glibc-devel glib2 glib2-devel bzip2 bzip2-devel ncurses ncurses-devel curl curl-devel e2fsprogs e2fsprogs-devel krb5 krb5-devel libidn libidn-devel openssl-devel

一般我们都需要先装pcre, zlib,前者为了重写rewrite,后者为了gzip压缩。

可以是任何目录,本文选定的是/data/soft/src

一:Nginx安装

cd /data/soft/src

1.安装PCRE库

ftp://ftp.csx.cam.ac.uk/pub/software/programming/pcre/ 下载最新的 PCRE 源码包,使用下面命令下载编译和安装 PCRE 包:

cd /data/soft/src
wget ftp://ftp.csx.cam.ac.uk/pub/software/programming/pcre/pcre-8.38.tar.gz
tar -zxvf pcre-8.34.tar.gz
cd pcre-8.34
./configure
make
make install

2.安装zlib库

http://zlib.net/zlib-1.2.8.tar.gz 下载最新的 zlib 源码包,使用下面命令下载编译和安装 zlib包:

cd /data/soft/src
wget http://zlib.net/zlib-1.2.8.tar.gz
tar -zxvf zlib-1.2.8.tar.gz
cd zlib-1.2.8
./configure
make
make install

3.安装ssl(某些vps默认没装ssl)

cd /data/soft/src
wget http://www.openssl.org/source/openssl-1.0.2e.tar.gz
tar -zxvf openssl-1.0.2e.tar.gz
./config
make && make install
cp apps/openssl /usr/bin/

4.安装nginx

cd /data/soft/src
wget http://nginx.org/download/nginx-1.4.2.tar.gz
tar -zxvf nginx-1.4.2.tar.gz
cd nginx-1.4.2
./configure --sbin-path=/data/soft/nginx/nginx \--conf-path=/data/soft/nginx/nginx.conf \--pid-path=/data/soft/nginx/nginx.pid \--with-http_ssl_module \--with-pcre=/data/soft/src/pcre-8.38 \--with-zlib=/data/soft/src/zlib-1.2.8 \--with-openssl=/data/soft/src/openssl-1.0.2e
make
make install

安装成功后 /data/soft/nginx 目录下如下:
  fastcgi.conf            koi-win             nginx.conf.default
  fastcgi.conf.default    logs                scgi_params
  fastcgi_params          mime.types          scgi_params.default
  fastcgi_params.default  mime.types.default  uwsgi_params
  html                    nginx               uwsgi_params.default
  koi-utf                 nginx.conf          win-utf

5.启动

确保系统的 80 端口没被其他程序占用,运行/data/soft/nginx/nginx 命令来启动 Nginx,

netstat -ano|grep 80
如果查不到结果后执行,有结果则忽略此步骤
sudo /usr/local/nginx/nginx

打开浏览器访问此机器的 IP,如果浏览器出现 Welcome to nginx! 则表示 Nginx 已经安装并运行成功。

到这里nginx就安装完成了,如果只是处理静态html就不用继续安装了,如果你需要处理php脚本的话,还需要安装php-fpm。

6.Nginx开机启动

echo "/data/soft/nginx/sbin/nginx" >> /etc/rc.local

二:编译安装php-fpm

PHP-FPM是一个PHP FastCGI管理器,是只用于PHP的,可以在 http://php-fpm.org/download下载得到.

PHP-FPM其实是PHP源代码的一个补丁,旨在将FastCGI进程管理整合进PHP包中。必须将它patch到你的PHP源代码中,在编译安装PHP后才可以使用。

新版PHP已经集成php-fpm了,不再是第三方的包了,推荐使用。PHP-FPM提供了更好的PHP进程管理方式,可以有效控制内存和进程、可以平滑重载PHP配置,比spawn-fcgi具有更多优点,所以被PHP官方收录了。在./configure的时候带 –enable-fpm参数即可开启PHP-FPM,其它参数都是配置php的,具体选项含义可以到这里查看:http://www.php.net/manual/en/configure.about.php

1.php-fpm安装(推荐安装方式)

cd /data/soft/src
wget http://museum.php.net/php5/php-5.4.7.tar.gz
tar zvxf php-5.4.7.tar.gz
cd php-5.4.7
./configure --prefix=/data/soft/php --enable-fpm --with-mcrypt \--enable-mbstring --disable-pdo --with-curl --disable-debug  --disable-rpath \--enable-inline-optimization --with-bz2  --with-zlib --enable-sockets \--enable-sysvsem --enable-sysvshm --enable-pcntl --enable-mbregex \--with-mhash --enable-zip --with-pcre-regex --with-mysql --with-mysqli \--with-gd --with-jpeg-dir --enable-pdo --enable-ftp --with-pdo_sqlite --with-openssl=/usr/local/ssl/ --with-pdo_mysql
make && make install

2.以上就完成了php-fpm的安装

下面是对php-fpm运行用户进行设置
cd /data/soft/php
cp etc/php-fpm.conf.default etc/php-fpm.conf

vi etc/php-fpm.conf
修改
  user = www
  group = www

  如果www用户不存在,那么先添加www用户
    groupadd www
    useradd -g www www

3.修改nginx配置文件以支持php-fpm

修改nginx配置文件为,nginx.conf
其中server段增加如下配置:

# pass the PHP scripts to FastCGI server listening on 127.0.0.1:9000
location ~ \.php$ {
  root /data/www; #项目根目录
  fastcgi_pass 127.0.0.1:9000;
  fastcgi_index index.php;
  fastcgi_param SCRIPT_FILENAME $document_root$fastcgi_script_name;
  include fastcgi_params;
}

重启nginx服务器
  /data/nginx/nginx -s reload


4.创建测试php文件

在/data/www下创建index.php文件,输入如下内容:
<?php
  echo phpinfo();
?>

5.启动php-fpm服务

/data/soft/php/sbin/php-fpm

5.5杀死php-fpm进程

killall php-fpm(可以配合启动命令实现重启效果)

6.php-fpm关闭与重启

php-fpm 关闭
  kill -INT `cat /data/soft/php/var/run/php-fpm.pid`

php-fpm 重启
  kill -USR2 `cat /data/soft/php/var/run/php-fpm.pid`

7.php-fpm开机启动

echo "/data/soft/php/sbin/php-fpm" >> /etc/rc.local

8.解决php-fpm.pid文件不存在(重启php-fpm)

vim /data/soft/php/etc/php-fpm.conf
  打开 pid = run/php-fpm.pid

三:mysql安装

cd /data/soft/src
wget http://downloads.mysql.com/archives/mysql-5.1/mysql-5.1.70.tar.gz
tar -zxvf mysql-5.1.70.tar.gz
cd mysql-5.1.70

yum install ncurses ncurses-devel
./configure  '--prefix=/data/soft/mysql' '--without-debug' '--with-charset=utf8' '--with-extra-charsets=all' '--enable-assembler' '--with-pthread' '--enable-thread-safe-client' '--with-mysqld-ldflags=-all-static' '--with-client-ldflags=-all-static' '--with-big-tables' '--with-readline' '--with-ssl' '--with-embedded-server' '--enable-local-infile' '--with-plugins=innobase'  make
make install

到此mysql就安装到了/data/soft/mysql路径下,下面开始mysql的配置工作

配置文件

cp support-files/my-medium.cnf /etc/my.cnf

mysql设置开机自启动

cp -r support-files/mysql.server /etc/init.d/mysqld  
/sbin/chkconfig --del mysqld
/sbin/chkconfig --add mysqld

配置权限表

chown -R mysql:mysql /data/soft/mysql
/data/soft/mysql/bin/mysql_install_db --user=mysql

启动mysql

/etc/init.d/mysqld start

mysql初始化配置

export PATH=/data/soft/mysql/bin:$PATH
/data/soft/mysql/bin/mysql_secure_installation
注:这里根据提示设置mysql的root密码

到这里mysql安装完成了, 我们开始使用客户端连接mysql

如果报错:
  SQL Error (1130): Host '192.168.1.100' is not allowed to connect to this MySQL server

首先按下面的步骤登录Mysql服务器

登录mysql需要切换到dos下的mysql的bin目录,进行如下操作:

#mysql -uroot -ppassword
mysql>use mysql;

mysql>update user set host = '%'  where user ='root';

mysql>flush privileges;

mysql>select 'host','user' from user where user='root';

mysql>quit
OK。远程连接成功!

软件包可以到360云盘直接下载:http://yunpan.cn/cfX8FB5UTnfDR (提取码:91e7)
阅读全文

2015最新CentOS安装Nginx+PHP
发表于 2015-8-31 | 浏览(5239) | 服务器

yum安装基本库

yum -y install automake autoconf libtool make gcc gcc-c++ libmcrypt-devel mhash-devel libxslt-devel libjpeg libjpeg-devel libpng libpng-devel freetype freetype-devel libxml2 libxml2-devel zlib zlib-devel glibc glibc-devel glib2 glib2-devel bzip2 bzip2-devel ncurses ncurses-devel curl curl-devel e2fsprogs e2fsprogs-devel krb5 krb5-devel libidn libidn-devel openssl openssl-devel

准备

mkdir /data
cd /data
mkdir soft www logs dbdata
cd soft/
mkdir nginx php mysql
cd ../logs
mkdir nginx php mysql

一:Nginx安装

cd /data/soft/src

1.安装PCRE库

ftp://ftp.csx.cam.ac.uk/pub/software/programming/pcre/ 下载最新的 PCRE 源码包,使用下面命令下载编译和安装 PCRE 包:

cd /data/soft/src
wget ftp://ftp.csx.cam.ac.uk/pub/software/programming/pcre/pcre-8.40.tar.gz
tar -zxvf pcre-8.40.tar.gz
cd pcre-8.40
./configure
make && make install

2.安装zlib库

http://zlib.net/zlib-1.2.11.tar.gz 下载最新的 zlib 源码包,使用下面命令下载编译和安装 zlib包:

cd /data/soft/src
wget http://zlib.net/zlib-1.2.11.tar.gz
tar -zxvf zlib-1.2.11.tar.gz
cd zlib-1.2.11
./configure
make && make install

3.安装ssl(某些vps默认没装ssl)

cd /data/soft/src
wget http://www.openssl.org/source/openssl-1.0.2.tar.gz
tar -zxvf openssl-1.0.2.tar.gz
./config
make && make install
cp apps/openssl /usr/bin/
如果提示覆盖,确认就OK了,再查看openssl version版本就是最新版了

4.安装nginx

Nginx 一般有两个版本,分别是稳定版和开发版,您可以根据您的目的来选择这两个版本的其中一个,下面是把 Nginx 安装到 /data/soft/nginx 目录下的详细步骤:

cd /data/soft/src
wget http://nginx.org/download/nginx-1.4.2.tar.gz
tar -zxvf nginx-1.4.2.tar.gz
cd nginx-1.4.2
./configure --prefix=/data/soft/nginx \--sbin-path=/data/soft/nginx/nginx \--conf-path=/data/soft/nginx/nginx.conf \--pid-path=/data/soft/nginx/nginx.pid \--lock-path=/data/soft/nginx/nginx.lock \--error-log-path=/data/logs/nginx/error.log \--http-log-path=/data/logs/nginx/access.log \--http-client-body-temp-path=/data/logs/nginx/client_body_temp \--http-proxy-temp-path=/data/logs/nginx/proxy_temp \--http-fastcgi-temp-path=/data/logs/nginx/fastcgi_temp \--http-uwsgi-temp-path=/data/logs/nginx/uwsgi_temp \--http-scgi-temp-path=/data/logs/nginx/scgi_temp \--user=nginx \--group=nginx \--with-http_ssl_module \--with-pcre=/data/src/pcre-8.40 \--with-zlib=/data/src/zlib-1.2.11 \--with-openssl=/data/src/openssl-1.0.2e
make && make install

cp /data/soft/nginx/nginx /etc/init.d/
/etc/init.d/nginx           启动nginx
/etc/init.d/nginx -s reload     重启nginx
/etc/init.d/nginx -s stop       关闭nginx

添加nginx开机启动

echo "/etc/init.d/nginx" >> /etc/rc.local

二:编译安装php-fpm

PHP-FPM是一个PHP FastCGI管理器,是只用于PHP的,可以在 http://php-fpm.org/download下载得到.

PHP-FPM其实是PHP源代码的一个补丁,旨在将FastCGI进程管理整合进PHP包中。必须将它patch到你的PHP源代码中,在编译安装PHP后才可以使用。

新版PHP已经集成php-fpm了,不再是第三方的包了,推荐使用。PHP-FPM提供了更好的PHP进程管理方式,可以有效控制内存和进程、可以平滑重载PHP配置,比spawn-fcgi具有更多优点,所以被PHP官方收录了。在./configure的时候带 –enable-fpm参数即可开启PHP-FPM,其它参数都是配置php的,具体选项含义可以到这里查看:http://www.php.net/manual/en/configure.about.php

1.php-fpm安装(推荐安装方式)

cd /data/soft/src
wget http://museum.php.net/php5/php-5.4.7.tar.gz
tar zvxf php-5.4.7.tar.gz
cd php-5.4.7
./configure --prefix=/data/soft/php --enable-fpm --with-mcrypt \--enable-mbstring --disable-pdo --with-curl --disable-debug  --disable-rpath \--enable-inline-optimization --with-bz2  --with-zlib --enable-sockets \--enable-sysvsem --enable-sysvshm --enable-pcntl --enable-mbregex \--with-mhash --enable-zip --with-pcre-regex --with-mysql --with-mysqli \--with-gd --with-jpeg-dir --enable-pdo --enable-ftp --with-pdo_sqlite --with-openssl=/usr/local/ssl/ --with-pdo_mysql
make && make install

2.以上就完成了php-fpm的安装、下面是对php-fpm运行用户进行设置

cd /data/soft/php
cp etc/php-fpm.conf.default etc/php-fpm.conf

vi etc/php-fpm.conf 修改
user = www
group = www

如果www用户不存在,那么先添加www用户
  groupadd www
  useradd -g www www

去掉前面的注释
  pid = run/php-fpm.pid

3.修改nginx配置文件以支持php-fpm

修改nginx配置文件为,nginx.conf

其中server段增加如下配置

# pass the PHP scripts to FastCGI server listening on 127.0.0.1:9000
  location ~ \.php$ {
  root /data/www; #项目根目录
  fastcgi_pass 127.0.0.1:9000;
  fastcgi_index index.php;
  fastcgi_param SCRIPT_FILENAME $document_root$fastcgi_script_name;
  include fastcgi_params;
}

重启nginx服务器
  /data/nginx/nginx -s reload

4.创建测试php文件、在/data/www下创建index.php文件,输入如下内容

<?php
  echo phpinfo();
?>

5.启动php-fpm服务

/data/soft/php/sbin/php-fpm

5.5杀死php-fpm进程

killall php-fpm(可以配合启动命令实现重启效果)

6.php-fpm关闭与重启

php-fpm 关闭
  kill -INT `cat /data/soft/php/var/run/php-fpm.pid`

php-fpm 重启
  kill -USR2 `cat /data/soft/php/var/run/php-fpm.pid`

7.php-fpm开机启动

cp /data/soft/php/sbin/php-fpm /etc/init.d/php-fpm
echo "/etc/init.d/php-fpm" >> /etc/rc.local

阅读全文

Nginx常见配置文件参数设置 nginx.conf配置
发表于 2015-8-31 | 浏览(5732) | 服务器
虚拟机在同一个配置文件进行配置 nginx.conf

#运行用户
user www www;

#启动进程,通常设置成和cpu的数量相等
worker_processes  1;

#一个nginx进程打开的最多文件描述符数目,理论值应该是最多打开文件数(系统的值ulimit -n)与nginx进程数相除,但是nginx分配请求并不均匀,所以建议与ulimit -n的值保持一致。
worker_rlimit_nofile 65535;

#全局错误日志
error_log  /data/log/error.log;

#error_log  logs/error.log  notice;
#error_log  logs/error.log  info;
#pid        logs/nginx.pid;

events {
    #epoll是多路复用IO(I/O Multiplexing)中的一种方式,但是仅用于linux2.6以上内核,可以大大提高nginx的性能
    use epoll;

    #单个后台worker process进行的最大并发连接数
    worker_connections  65535;
}

http{
    #配置信息
    include mime.types; #文件扩展名与文件类型映射表
    default_type application/octet-stream; #默认文件类型
    #charset utf-8; #默认编码
    server_names_hash_bucket_size 128; #服务器名字的hash表大小
    client_header_buffer_size 32k; #上传文件大小限制
    large_client_header_buffers 4 64k; #设定请求缓
    client_max_body_size 8m; #设定请求缓
    sendfile on; #开启高效文件传输模式,sendfile指令指定nginx是否调用sendfile函数来输出文件,对于普通应用设为 on,如果用来进行下载等应用磁盘IO重负载应用,可设置为off,以平衡磁盘与网络I/O处理速度,降低系统的负载。注意:如果图片显示不正常把这个改成off。
    autoindex on; #开启目录列表访问,合适下载服务器,默认关闭。
    tcp_nopush on; #防止网络阻塞
    tcp_nodelay on; #防止网络阻塞
    keepalive_timeout 120; #长连接超时时间,单位是秒

    #FastCGI相关参数是为了改善网站的性能:减少资源占用,提高访问速度。下面参数看字面意思都能理解。
    fastcgi_connect_timeout 300;
    fastcgi_send_timeout 300;
    fastcgi_read_timeout 300;
    fastcgi_buffer_size 64k;
    fastcgi_buffers 4 64k;
    fastcgi_busy_buffers_size 128k;
    fastcgi_temp_file_write_size 128k;

    #gzip模块设置
    gzip on; #开启gzip压缩输出
    gzip_min_length 1k; #最小压缩文件大小
    gzip_buffers 4 16k; #压缩缓冲区
    gzip_http_version 1.0; #压缩版本(默认1.1,前端如果是squid2.5请使用1.0)
    gzip_comp_level 2; #压缩等级
    #gzip_types text/plain text/css text/javascrip application/javascript application/x-javascript image/jepg image/gif image/png;
    gzip_types text/plain text/css text/javascrip application/javascript application/x-javascript;
    #压缩类型,默认就已经包含textml,所以下面就不用再写了,写上去也不会有问题,但是会有一个warn。
    gzip_vary on;
    #limit_zone crawler $binary_remote_addr 10m; #开启限制IP连接数的时候需要使用

    #文件缓存
    open_file_cache max=65535 inactive=60s; #这个将为打开文件指定缓存,默认是没有启用的,max指定缓存数量,建议和打开文件数一致,inactive 是指经过多长时间文件没被请求后删除缓存。
    open_file_cache_valid 80s; #这个是指多长时间检查一次缓存的有效信息。
    open_file_cache_min_uses 1; #参数时间内文件的最少使用次数,如果超过这个数字,文件描述符一直是在缓存中打开的,如上例,如果有一个文件在inactive 时间内一次没被使用,它将被移除。

    #开启404
    fastcgi_intercept_errors on;

    # https
    server {
        listen443;
        server_namewww.gongfuxiang.com gongfuxiang.com *.gongfuxiang.com;
        if ( $host != 'www.gongfuxiang.com' ) {
            rewrite ^/(.*)$ https://www.gongfuxiang.com/$1 permanent;
        }

        access_log/data/log/access.log;
        error_log/data/log/error.log warn;
        indexindex.html index.htm index.php;
        root/data/www;
        autoindexoff;
        include/data/www/.htaccess;

        sslon;
        ssl_certificate/data/https_rsa/gongfuxiang.pem;
        ssl_certificate_key/data/https_rsa/gongfuxiang.key;
        ssl_session_timeout5m;

        #4000,500错误定义
        error_page  404 http://$server_name;
        #error_page  500 502 503 504  /50x.html;

        #PHP 脚本请求全部转发到 FastCGI处理. 使用FastCGI默认配置
        location ~ \.php$ {
            fastcgi_pass   127.0.0.1:9000;
            fastcgi_param  SCRIPT_FILENAME  $document_root$fastcgi_script_name;
            include        fastcgi_params;
        }

        #JS和CSS缓存时间设置
        location ~ .*.(js|css)?$
        {
            expires 1h;
        }

        #所有静态文件由nginx直接读取不经过tomcat或resin
        location ~ .*.(htm|html|gif|jpg|jpeg|png|bmp|swf|ioc|rar|zip|txt|flv|mid|doc|ppt|pdf|xls|mp3|wma)$
        {
            expires 15d;
        }
     }

    # http
    server {
        listen80 default;
        server_namewww.gongfuxiang.com gongfuxiang.com *.gongfuxiang.com;
        if ( $host != 'www.qualifes.com' ) {
            rewrite ^/(.*)$ http://www.gongfuxiang.com/$1 permanent;
        }

        access_log/data/log/access.log;
        error_log/data/log/error.log warn;
        indexindex.html index.htm index.php;
        root/data/www;
        autoindexoff;
        include/data/www/.htaccess;
        #400,500错误定义
        error_page  404 http://$server_name;
        #error_page  500 502 503 504  /50x.html;

        #PHP 脚本请求全部转发到 FastCGI处理. 使用FastCGI默认配置
        location ~ \.php$ {
            fastcgi_pass   127.0.0.1:9000;
            fastcgi_param  SCRIPT_FILENAME  $document_root$fastcgi_script_name;
            include        fastcgi_params;
        }

        #JS和CSS缓存时间设置
        location ~ .*.(js|css)?$
        {
            expires 1h;
        }

        #所有静态文件由nginx直接读取不经过tomcat或resin
        location ~ .*.(htm|html|gif|jpg|jpeg|png|bmp|swf|ioc|rar|zip|txt|flv|mid|doc|ppt|pdf|xls|mp3|wma)$
        {
            expires 15d;
        }
    }
}

阅读全文

Nginx配置多个虚拟机
发表于 2015-8-31 | 浏览(5605) | 服务器
虚拟机分开管理方式
nginx.conf 文件配置如下

#运行用户
user www www;

#启动进程,通常设置成和cpu的数量相等
worker_processes  1;

#一个nginx进程打开的最多文件描述符数目,理论值应该是最多打开文件数(系统的值ulimit -n)与nginx进程数相除,但是nginx分配请求并不均匀,所以建议与ulimit -n的值保持一致。
worker_rlimit_nofile 65535;

#全局错误日志
error_log  /data/log/error.log;

#error_log  logs/error.log  notice;
#error_log  logs/error.log  info;
#pid        logs/nginx.pid;

events {
    #epoll是多路复用IO(I/O Multiplexing)中的一种方式,但是仅用于linux2.6以上内核,可以大大提高nginx的性能
    use epoll;

    #单个后台worker process进行的最大并发连接数
    worker_connections  65535;
}

http{
    #配置信息
    include mime.types; #文件扩展名与文件类型映射表
    default_type application/octet-stream; #默认文件类型

    #charset utf-8; #默认编码
    server_names_hash_bucket_size 128; #服务器名字的hash表大小
    client_header_buffer_size 32k; #上传文件大小限制
    large_client_header_buffers 4 64k; #设定请求缓
    client_max_body_size 8m; #设定请求缓
    sendfile on; #开启高效文件传输模式,sendfile指令指定nginx是否调用sendfile函数来输出文件,对于普通应用设为 on,如果用来进行下载等应用磁盘IO重负载应用,可设置为off,以平衡磁盘与网络I/O处理速度,降低系统的负载。注意:如果图片显示不正常把这个改成off。
    autoindex on; #开启目录列表访问,合适下载服务器,默认关闭。
    tcp_nopush on; #防止网络阻塞
    tcp_nodelay on; #防止网络阻塞
    keepalive_timeout 120; #长连接超时时间,单位是秒

    #FastCGI相关参数是为了改善网站的性能:减少资源占用,提高访问速度。下面参数看字面意思都能理解。
    fastcgi_connect_timeout 300;
    fastcgi_send_timeout 300;
    fastcgi_read_timeout 300;
    fastcgi_buffer_size 64k;
    fastcgi_buffers 4 64k;
    fastcgi_busy_buffers_size 128k;
    fastcgi_temp_file_write_size 128k;

    #gzip模块设置
    gzip on; #开启gzip压缩输出
    gzip_min_length 1k; #最小压缩文件大小
    gzip_buffers 4 16k; #压缩缓冲区
    gzip_http_version 1.0; #压缩版本(默认1.1,前端如果是squid2.5请使用1.0)
    gzip_comp_level 2; #压缩等级
    #gzip_types text/plain text/css text/javascrip application/javascript application/x-javascript image/jepg image/gif image/png;
    gzip_types text/plain text/css text/javascrip application/javascript application/x-javascript;
    #压缩类型,默认就已经包含textml,所以下面就不用再写了,写上去也不会有问题,但是会有一个warn。
    gzip_vary on;
    #limit_zone crawler $binary_remote_addr 10m; #开启限制IP连接数的时候需要使用

    #文件缓存
    open_file_cache max=65535 inactive=60s; #这个将为打开文件指定缓存,默认是没有启用的,max指定缓存数量,建议和打开文件数一致,inactive 是指经过多长时间文件没被请求后删除缓存。
    open_file_cache_valid 80s; #这个是指多长时间检查一次缓存的有效信息。
    open_file_cache_min_uses 1; #参数时间内文件的最少使用次数,如果超过这个数字,文件描述符一直是在缓存中打开的,如上例,如果有一个文件在inactive 时间内一次没被使用,它将被移除。

    #开启404
    fastcgi_intercept_errors on;
    #载入虚拟机配置文件, 载入vhost目录下的所有配置文件, 目录位与nginx.conf同级
    include vhost/*.conf;
}

vhost/demo.conf 文件配置如下
# https
server {
        listen443;
        server_namewww.gongfuxiang.com gongfuxiang.com *.gongfuxiang.com;
        if ( $host != 'www.gongfuxiang.com' ) {
        rewrite ^/(.*)$ https://www.gongfuxiang.com/$1 permanent;
    }
    access_log/data/log/access.log;
    error_log/data/log/error.log warn;
    indexindex.html index.htm index.php;
    root/data/www;
    autoindexoff;
    include/data/www/.htaccess;

    sslon;
    ssl_certificate/data/https_rsa/gongfuxiang.pem;
    ssl_certificate_key/data/https_rsa/gongfuxiang.key;
    ssl_session_timeout5m;

    #4000,500错误定义
    error_page  404 http://$server_name;
    #error_page  500 502 503 504  /50x.html;

    #PHP 脚本请求全部转发到 FastCGI处理. 使用FastCGI默认配置
    location ~ \.php$ {
        fastcgi_pass   127.0.0.1:9000;
        fastcgi_param  SCRIPT_FILENAME  $document_root$fastcgi_script_name;
        include        fastcgi_params;
    }

    #JS和CSS缓存时间设置
    location ~ .*.(js|css)?$
    {
        expires 1h;
    }

    #所有静态文件由nginx直接读取不经过tomcat或resin
    location ~ .*.(htm|html|gif|jpg|jpeg|png|bmp|swf|ioc|rar|zip|txt|flv|mid|doc|ppt|pdf|xls|mp3|wma)$
    {
        expires 15d;
    }
}

# http
server {
    listen80 default;
    server_namewww.gongfuxiang.com gongfuxiang.com *.gongfuxiang.com;
    if ( $host != 'www.qualifes.com' ) {
        rewrite ^/(.*)$ http://www.gongfuxiang.com/$1 permanent;
    }
    access_log/data/log/access.log;
    error_log/data/log/error.log warn;
    indexindex.html index.htm index.php;
    root/data/www;
    autoindexoff;
    include/data/www/.htaccess;
    #400,500错误定义
    error_page  404 http://$server_name;
    #error_page  500 502 503 504  /50x.html;

    #PHP 脚本请求全部转发到 FastCGI处理. 使用FastCGI默认配置
    location ~ \.php$ {
        fastcgi_pass   127.0.0.1:9000;
        fastcgi_param  SCRIPT_FILENAME  $document_root$fastcgi_script_name;
        include        fastcgi_params;
    }

    #JS和CSS缓存时间设置
    location ~ .*.(js|css)?$
    {
        expires 1h;
    }

    #所有静态文件由nginx直接读取不经过tomcat或resin
    location ~ .*.(htm|html|gif|jpg|jpeg|png|bmp|swf|ioc|rar|zip|txt|flv|mid|doc|ppt|pdf|xls|mp3|wma)$
    {
        expires 15d;
    }
}

如果有新的虚拟机添加,则在vhost目录下拷贝一个虚拟机配置文件进行修改项目路径以及其它配置即可。

阅读全文

CentOS下使用Ngin反向代理配置服务器集群
发表于 2015-8-31 | 浏览(6542) | 服务器

目录结构

/data/soft/src       软件库
/data/soft/nginx    nginx安装目录
/data/www       项目根目录

1.安装PCRE库

ftp://ftp.csx.cam.ac.uk/pub/software/programming/pcre/ 下载最新的 PCRE 源码包,使用下面命令下载编译和安装 PCRE 包:

cd /data/soft/src
ftp://ftp.csx.cam.ac.uk/pub/software/programming/pcre/pcre-8.35.tar.gz
tar -zxvf pcre-8.35.tar.gz
cd pcre-8.35
./configure
make && make install

2.安装nginx

Nginx 一般有两个版本,分别是稳定版和开发版,您可以根据您的目的来选择这两个版本的其中一个,下面是把 Nginx 安装到 /data/soft/nginx 目录下的详细步骤:

cd /data/soft/src
wget http://nginx.org/download/nginx-1.4.2.tar.gz
tar -zxvf nginx-1.4.2.tar.gz
cd nginx-1.4.2
./configure --sbin-path=/data/soft/nginx/nginx \--conf-path=/data/soft/nginx/nginx.conf \--pid-path=/data/soft/nginx/nginx.pid \--with-http_ssl_module \--with-pcre=/data/soft/src/pcre-8.35 --with-http_gzip_static_module --with-http_stub_status_module
make && make install

其中参数 --with-http_stub_status_module 是为了启用 nginx 的 NginxStatus 功能,用来监控 Nginx 的当前状态。

cp /data/soft/nginx/nginx /etc/init.d/
/etc/init.d/nginx               启动nginx
/etc/init.d/nginx -s reload     重启nginx
/etc/init.d/nginx -s stop       关闭nginx

添加nginx开机启动
echo "/etc/init.d/nginx" >> /etc/rc.local

3.配置nginx.conf    文件位置 /data/soft/nginx/nginx.conf

user  www;# 工作进程的属主
worker_processes  4;# 工作进程数,一般与 CPU 核数等同

#error_log  logs/error.log; 
#error_log  logs/error.log  notice; 
#error_log  logs/error.log  info; 

#pid        logs/nginx.pid; 

events { 
    use epoll;#Linux 下性能最好的 event 模式
    worker_connections  2048;# 每个工作进程允许最大的同时连接数
} 

http
{
    include       mime.types; 
    default_type  application/octet-stream; 

    #log_format  main  '$remote_addr - $remote_user [$time_local] $request ' 
    #                  '"$status" $body_bytes_sent "$http_referer" ' 
    #                  '"$http_user_agent" "$http_x_forwarded_for"'; 

    #access_log  off; 
    access_log  logs/access.log;# 日志文件名

    sendfile        on; 
    #tcp_nopush     on; 
    tcp_nodelay     on; 

    keepalive_timeout  65; 

    #include     gzip.conf; #gzip压缩配置

    # 集群中的所有后台服务器的配置信息
    upstream tomcats { 
        server 192.168.14.126:81 weight=10;
        server 192.168.14.126:82 weight=10;
        server 192.168.44.126:83 weight=10;
    }

    server { 
        listen       80;#HTTP 的端口
        server_name  localhost; 

        charset utf-8; 

        #access_log  logs/host.access.log  main; 

        location ~ ^/NginxStatus/ { 
            stub_status on; #Nginx 状态监控配置
            access_log off; 
        } 

        location ~ ^/(WEB-INF)/ { 
            deny all; 
        } 

        location ~ \.(htm|html|asp|php|gif|jpg|jpeg|png|bmp|ico|rar|css|js|zip|java|jar|txt|flv|swf|mid|doc|ppt|xls|pdf|txt|mp3|wma)$ { 
            root /data/www;
            expires 24h; 
        } 

        location / { 
            proxy_pass http://tomcats; # 反向代理
            proxy_redirect off;
            proxy_set_header  X-Real-IP  $remote_addr;
            proxy_set_header X-Forwarded-For $proxy_add_x_forwarded_for;
        } 

        error_page 404 /html/404.html; 

        error_page 502 503 /html/502.html; 
        error_page 500 504 /50x.html; 
        location = /50x.html{ 
            root   html; 
        }
    }

    #引入虚拟机
    include vhost/*.conf;
}

4.在vhost目录下添加虚拟机      文件名称 /data/soft/nginx/vhost/one.conf

server {
    listen              *:81; #对于虚拟机配置端口
    server_name         localhost;
    access_log          /data/log/one_access.log;
    error_log           /data/log/one_error.log warn;
    index               index.html index.htm index.php;
    root                /data/www/one; #对应/data/www目录下创建三个目录
    autoindex           off;
    error_page          404 http://$server_name;

    location ~ .*.(js|css)?$
    {
        expires 1h;
    }

    location ~ .*.(htm|html|gif|jpg|jpeg|png|bmp|swf|ioc|rar|zip|txt|flv|mid|doc|ppt|pdf|xls|mp3|wma)$
    {
        expires 15d;
    }
}

创建文件 /data/www/one/index.html   内容:Th is One Node

按照此内容添加3个文件,listen和root对应修改

5.配置完成

重启nginx
访问 192.168.14.126 ,就可以看见不同效果了

阅读全文

TOP